TUSCAN LEVELING SYSTEM
INSTALLATION GUIDELINES
For best results, before using straps, the straps should be soaked overnight, or for at least an hour prior to use in hot water. This increases the straps elastic strength, giving them maximum tension needed for proper installation. Please note: if you are using the straps in an extremely dry climate you may need to re-soak the straps prior to use.
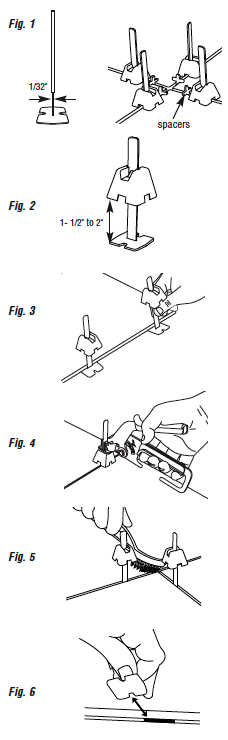
The Tuscan Leveling System™ straps will achieve a 1/32-grout joint, if you want a wider joint, you can use the Tuscan Leveling System™ with most common spacers. Simply insert corner or side spacers of the desired width, up to 1/2 in. See Fig. 1.
Most installers find the Tuscan Leveling System™ works best when the thinset or mortar is mixed towards a thinner consistency but within the manufacturers specifications.
To facilitate a speedy installation, pre-assemble the straps and caps you will need for the days work, leaving 1-1/2 to 2 in. between the bottom of the caps and the strap bottom plate. See Fig. 2.
Insert pre-assembled caps and straps under the tile edge, sliding the straps base plate under the tile being installed, at least 2 per tile side, at about 2 in. to 3 in. from the corners (more for larger or more flexible tiles). The recommended spacing of each strap is 6 to10 in. apart. See Fig. 3.
Important note: When inserting the caps and strap under the side of the tile, DO NOT place them at the tile corners. Inserting them on tile corners will prevent an accurate installation, and could crack or break the corners of the tiles when removed. It will also be very hard to keep the grout joint line straight.
Make sure you always back-butter each tile just before installation.
Once the pre-assembled cap and strap is in place you are ready to set the tiles. After the insertion of the caps and straps on the side of the tiles, install the other tiles that fit against the first tiles. After that is done, tighten the straps and caps with the installation gun (manual or ergonomic) until tile is level with adjoining tiles. See Fig. 4.
Repeat this process and upon setting the next tile into place, make sure you keep your grout joints clean of thinset by using a cut off stiff paintbrush or any stiff nylon bristle brush. This will remove any excess setting material that may have oozed up in the joints. This is easily accomplished by wiping the mud away in the direction of the grout line. Always ensure that the grout joint is clean and ready to grout. It is very important to keep mud from hardening between the touching point of the strap and the tiles edge to ensure a clean break of the strap. See Fig. 5.
If you have to quit for the day and you will be continuing the installation the following day: make sure you remove the thinset or setting material from the last row of tiles, using the strap base to leave a small hollow spot for the following day to insert the base of the straps under it. See Fig. 6.
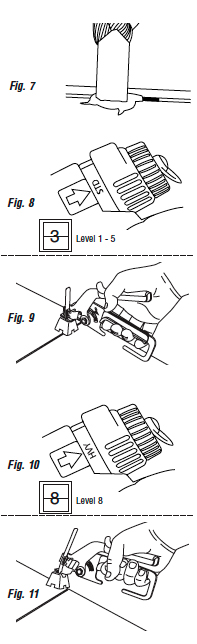
On the following day, begin by making sure you fill the hollow spots from the previous day with a margin trowel and ‘pack’ the tile underneath with thinset. Insert the straps and caps and start your installation again, following the same process as before. See Fig. 7.
TO TIGHTEN CAP AND SET TILE:
Instructions for using the Ergonomic Installation Tool Set tool lever to STD, then turn the smaller fine adjust red knob to level #1/5 To increase tension rotate knob clockwise, use higher STD number for setting bigger tiles. (The HVY setting is used only for breaking the straps). See Fig. 8. Place the installation tool on the strap to lock the cap into place. Pull the installation tool trigger until the desired tension is obtained, creating a lippage free surface.
Instructions for using the Manual Installation Tool
Place the manual installation tool on the strap to lock the cap into place. Squeeze the installation tool handle until the desired tension is obtained, creating a lippage free surface. See Fig. 9
TO BREAK STRAP AFTER MORTAR HAS SET:
After setting material has properly cured, remove the straps and caps by snapping the strap off at its breaking point. On the ergonomic tool set the installation tool lever to HVY, then turn smaller fine adjust red knob to highest setting #8. See Fig. 10. On the manual tool squeeze the installation tool handle until the strap breaks off. See Fig. 11.
CAUTION:
Breaking the strap: Some installers have reported that after the mortar has set they find it quicker to kick the caps in the direction of the grout joint so they easily break away. However, in doing this, one must use caution to avoid scratching the tile! With kicking or using a rubber mallet, you may cause the metal tongue in the cap to loosen or come out, rendering the cap useless.
Under normal use, the caps can be reused 25+ times.
DO'S
Place straps 2" from corner of the tile.
For best results always soak in lukewarm water prior to use for 2 hours, or 1/2 hour in hot water.
Use at minimum 50º F (10º C) or above after soaking.
Always back butter the tile or stone during installation.
Remove excess thinset from around the strap during installation
DON’TS
Do not place strap at the corner of the tile.
Do not bend the straps prior to use.
Do not use when frozen.
Do not place strap at the corner of the tile.
Do not bend the straps prior to use.
Do not use when frozen.
TUSCAN LEVELING SYSTEM ADVANTAGES
• Is changing the way the world installs tile.• Very easy to learn and use at any skill level.
• Virtually eliminates lippage.
• Installation is twice as fast.
• Prevents tiles from moving while drying.
• In some applications, tiles can be walked on while mud is wet.
• When the tile gets level, it stays that way.
• Virtually lippage free, flat surface drastically reduces the need for grinding.
• More profitable for the installer.
The Tuscan Leveling System is recommended by :


Tuscan Leveling System is a member of the following: